
This is part 4 of a 4-part tutorial. New here? Start with part 1.
Gamification of email
In this series of interactive email turoials I am going to be looking at the gamification of email. It’s great to have interactivity, but what if we could incentivise the interaction, making the user actually invested in interacting? We already have one of the key components of a game, interaction. But we need to add a few more key characteristics. Namely, we need to challenge the recipients with a task and provide a reward for completing this task.
This is actually a lot easier than it seems. For my example im simple going to use a trivia scenario. I will ask a question, and the recipient is required to answer it. The answer is provided by interacting with our character builder and finding the correct combination. Simple!
For my example, I have asked the question “Who is the 46th President of the USA?” as this is hopefully an easy question for the recipient. The answer is of course ‘Joe Biden’ and this is one of the characters in my character builder. There are also four other characters which can be built so we will add these as possible answers as well. Let’s add the questions and answers at the top of our interactive character builder.
<!-- Results -->
<div><h2>Q. Who is the 46th President of the USA?</h2></div>
<div class="answer">
 <h2 class="bold mb5 black">A. <span class="unknown bold mb0">???</span>
 <span class="name name1" style="color: #e61f26; font-weight: bold; margin-bottom: 10px;">Karate Master</span>
 <span class="name name2" style="color: #e61f26; font-weight: bold; margin-bottom: 10px;">Pumpkin King</span>
 <span class="name name3" style="color: #00a850; font-weight: bold; margin-bottom: 10px;">Joe Biden</span>
 <span class="name name4" style="color: #e61f26; font-weight: bold; margin-bottom: 10px;">John Brick</span>
 <span class="name name5" style="color: #e61f26; font-weight: bold; margin-bottom: 10px;">The King</span></h2>
</div>
We also need to add the HTML for the reward. In this case, I will be adding a simple visual button below the interactive character builder. This will display the recipients' promo code only once the correct combinations of checkboxes are checked.
<p class="code bold mt10 mb0 black" >Your Promo Code:</span></p> <div class="codebox"> <h2 class="code bold mb0 mt5 black" style="display: none;">I ❤️ EMAIL</span></h2> </div>
Lastly, let's add the CSS to make this gamification of email complete!
/* Results */
.answer .name { display: none; }

/* Display Results */
.slider1-rad1:checked ~ .slider2-rad2:checked ~ .slider3-rad5:checked ~ .answer .name1,
.slider1-rad2:checked ~ .slider2-rad3:checked ~ .slider3-rad1:checked ~ .answer .name2,
.slider1-rad5:checked ~ .slider2-rad1:checked ~ .slider3-rad4:checked ~ .answer .name3,
.slider1-rad3:checked ~ .slider2-rad4:checked ~ .slider3-rad2:checked ~ .answer .name4,
.slider1-rad4:checked ~ .slider2-rad5:checked ~ .slider3-rad3:checked ~ .answer .name5
{ display: inline-block !important; }

/* Hide Results */
.slider1-rad1:checked ~ .slider2-rad2:checked ~ .slider3-rad5:checked ~ .answer .unknown,
.slider1-rad2:checked ~ .slider2-rad3:checked ~ .slider3-rad1:checked ~ .answer .unknown,
.slider1-rad5:checked ~ .slider2-rad1:checked ~ .slider3-rad4:checked ~ .answer .unknown,
.slider1-rad3:checked ~ .slider2-rad4:checked ~ .slider3-rad2:checked ~ .answer .unknown,
.slider1-rad4:checked ~ .slider2-rad5:checked ~ .slider3-rad3:checked ~ .answer .unknown
{ display: none !important; }

/* Reward */
.slider1-rad5:checked ~ .slider2-rad1:checked ~ .slider3-rad4:checked ~ .codebox .code { display: inline-block !important; animation: wiggle 2.5s infinite; }
.slider1-rad5:checked ~ .slider2-rad1:checked ~ .slider3-rad4:checked ~ .codebox { animation: wiggle 2.5s infinite; }
.codebox:hover { animation: none; }

@keyframes wiggle { 0% { transform: rotate(0deg); } 20% { transform: rotate(0deg); } 25% { transform: rotate(5deg); } 35% { transform: rotate(-5deg); } 40% { transform: rotate(0deg); } 80% { transform: rotate(0deg); } 85% { transform: rotate(5deg); } 95% { transform: rotate(-5deg); } 100% { transform: rotate(0deg); } }

}
That's it! you should now have a working interactive character build complete with a gamified trivia experience. Check out the complete working example on my codepen here.
The Fallback: Graceful Degradation
It's important not to limit the potential of engaging with our customers threw interactive emails by having a 'glass half fall' mindset. Email clients which support interactivity hold roughly 50% of the market globally so start thinking of interactive emails as 'glass half full!'. We will provide an improved, more engaging experience for at least 1 in every 2 of your recipients! This means we also need to consider how the email will appear on email clients which do not support interactive emails. Typically this means on Outlook and most web-based email clients (Gmail, AOL, Yahoo, etc).
For these email clients, we will be serving up a static email, which, most likely would have been the way you would have built the email previous to learning about the awesome world of interactive emails ;) Depending on the complexity of your email the fallback can range from something very simple, like expanding a 'read more' section by default, all the way up to serving up an entirely different email design and content. It's dependant on the individual email and it's desired conversion.
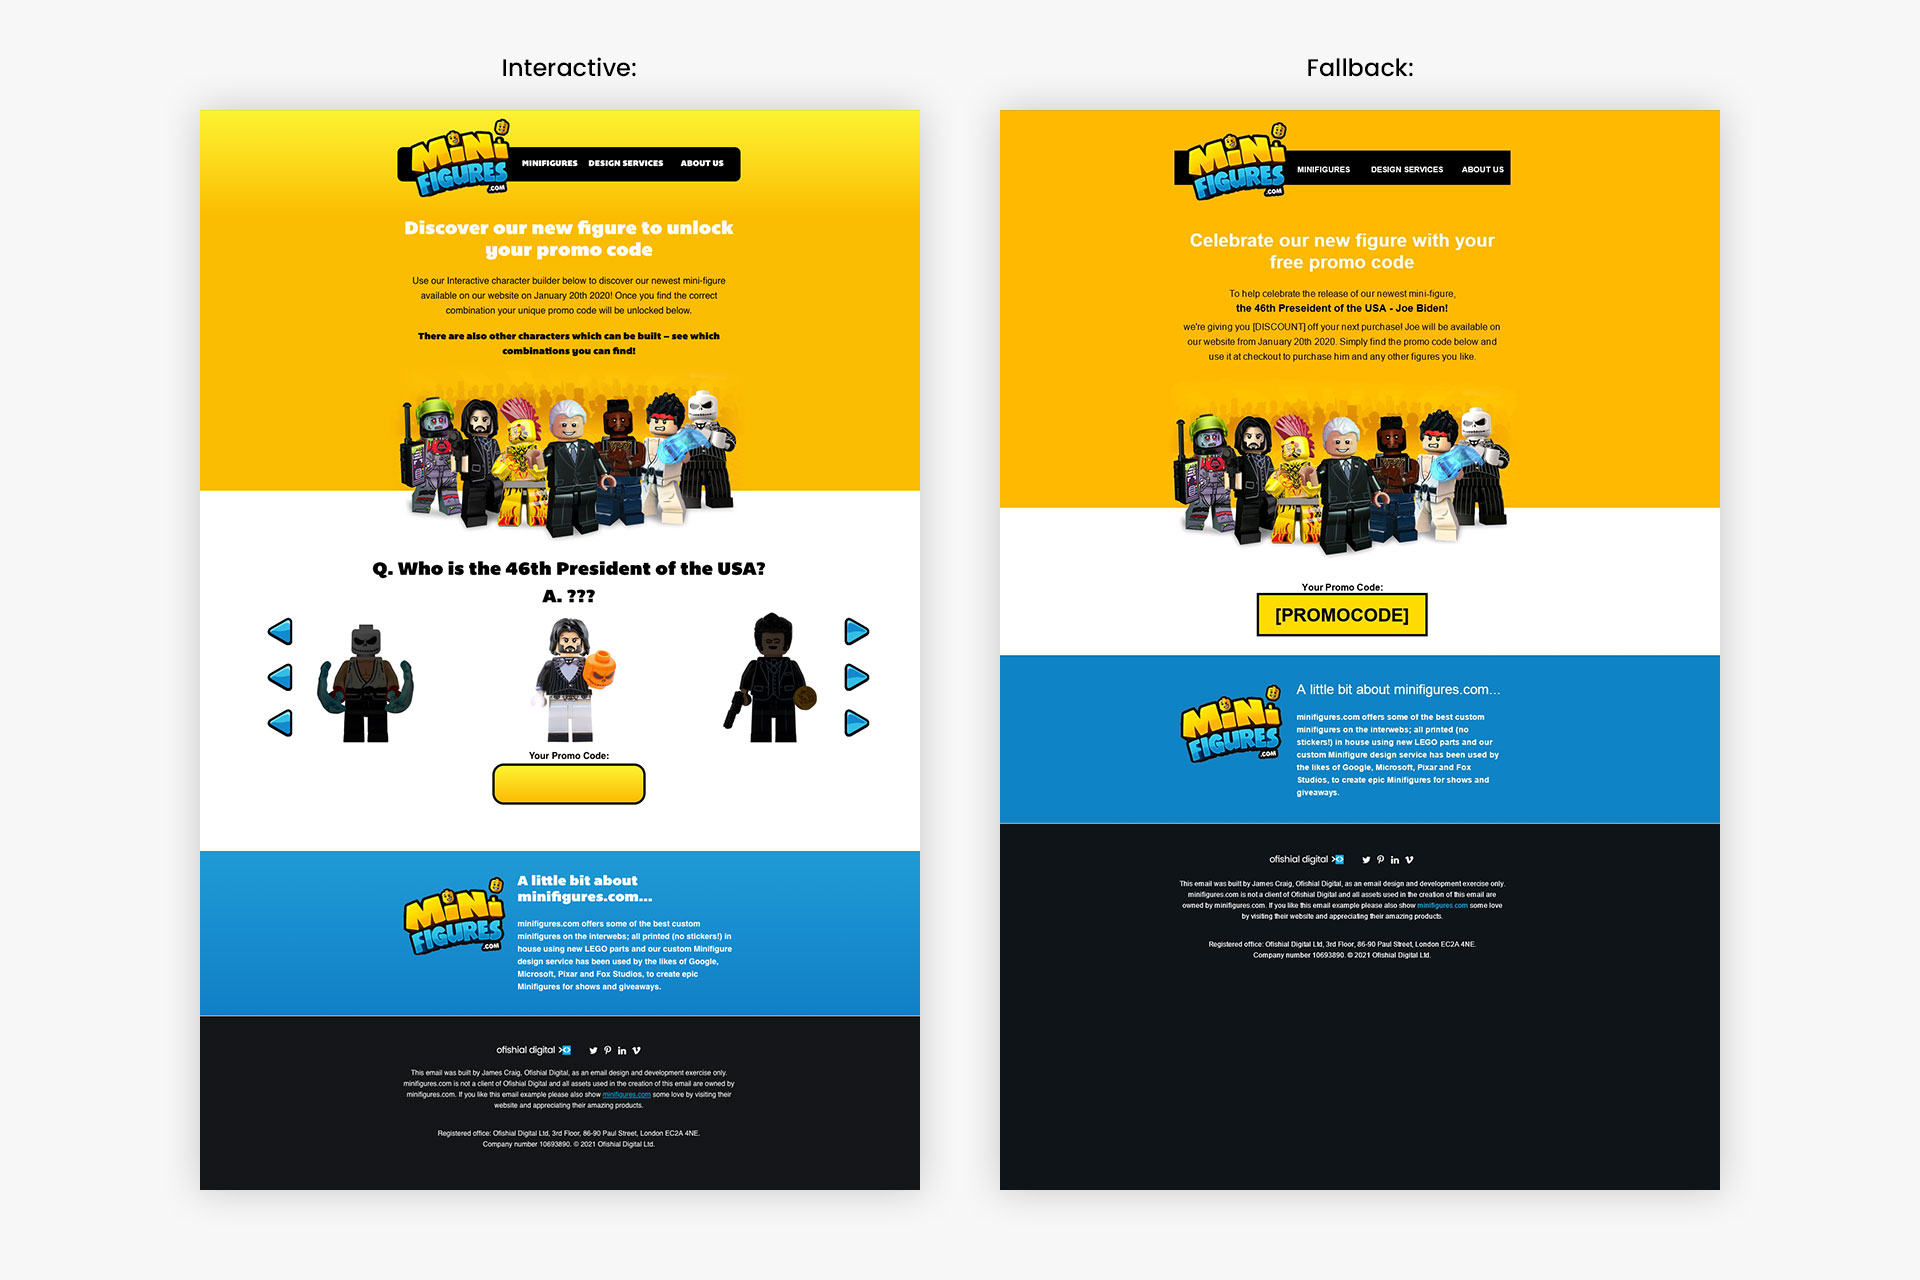
As the main content of this email is dependent on the interactive character builder's functionality we need to switch out the copy with something else which makes sense to the recipient. For this, I have provided a second content block which is shown by default and then hidden when interactivity is supported.
<!--[if !mso]><!-- --> <div id="h-mso-w" class="interactContent h-mso-m" style="display: none; visibility: hidden;"> <h2 class="bold white" style="font-family: Helvetica, Arial, sans-serif; margin: 0 0 20px 0; font-size: 32px; line-height: 38px; color: #FFFFFF; font-weight: bold;">Discover our new figure to unlock your promo code</h2> <p class="p1 black" style="font-family: Helvetica, Arial, sans-serif; color: #000000; margin: 0 0 20px 0; font-size: 16px; line-height: 26px;">Use our Interactive character builder below to discover our newest mini-figure available on our website on January 20th 2020! Once you find the correct combination your unique promo code will be unlocked below.</p> <h4 class="p1 bold black mb0" style="font-family: Helvetica, Arial, sans-serif; color: #000000; margin: 0 0 20px 0; font-size: 16px; line-height: 26px; font-weight: bold; margin-bottom: 0px;">There are also other characters which can be built – see which combinations you can find!</h4> </div> <!--<![endif]--> <div id="s-mso-w" class="fallback"> <h2 class="bold white" style="font-family: Helvetica, Arial, sans-serif; margin: 0 0 20px 0; font-size: 32px; line-height: 38px; color: #FFFFFF; font-weight: bold;">Celebrate our new figure with your free promo code</h2> <p class="p1 black mb5" style="font-family: Helvetica, Arial, sans-serif; color: #000000; margin: 0 0 20px 0; font-size: 16px; line-height: 26px; margin-bottom: 5px;">To help celebrate the release of our newest mini-figure,</p> <h4 class="bold fc black mb5" style="font-family: Helvetica, Arial, sans-serif; margin: 0 0 20px 0; font-size: 18px; line-height: 22px; color: #000000; font-weight: bold; margin-bottom: 5px;">the 46th Preseident of the USA - Joe Biden!</h4> <p class="p1 black" style="font-family: Helvetica, Arial, sans-serif; color: #000000; margin: 0 0 20px 0; font-size: 16px; line-height: 26px;">we're giving you [DISCOUNT] off your next purchase! Joe will be available on our website from January 20th 2020. Simply find the promo code below and use it at checkout to purchase him and any other figures you like.</p> </div>
You will see here that we are using similar classes to the interactive sections to hide/show the relevant content. We will need to add a few extra classes to our previous code, as below:
#MessageViewBody .fallback, body.MsgBody .fallback { display: block !important; visibility: visible !important; }
#MessageViewBody .slider, body.MsgBody .slider, #MessageViewBody .interactContent, body.MsgBody .interactContent { display: none !important; visibility: hidden !important; }

.fallback { display: none !important; visibility: hidden !important; }
.slider, .interactContent { display: block !important; visibility: visible !important; }
Lastly, one very important piece of code when working with interactive emails is used to ensure the interactive elements are hidden from Outlook's online versions (Outlook.com, Outlook365) and also from Outlook Mobile. This is essential as these email clients do support the CSS to show/hide the interactivity, but do not support the radio buttons themselves. So we need to ensure it is hidden and the fallback is shown.
<style type="text/css">

[id="x_h-mso-w"] { display: none !important; visibility: hidden !important; height: 0px !important; max-height: 0px !important; }
[id="x_s-mso-w"] { display: block !important; visibility: visible !important; overflow: visible !important; }

body[data-outlook-cycle] .h-mso-m { display: none !important; visibility: hidden !important; height: 0px !important; overflow: hidden !important; }
body[data-outlook-cycle] .fallback { display: block !important; visibility: visible !important; overflow: visible !important; }

</style>
For this to work your wrapper divs/tables need to have ID's specified with the names above or something similar which you define yourself. This is due to the way Outlook changes your code and adds its own classes. Once you build a few interactive emails you will get the hang of this and it can usually be standardised. The example code above I use in almost all my email builds.
Once you have this working and start running your testing in either Email on Acid or Litmus you will see your different designs and which email clients support your interactive code. My example's fallback looks like below:
Conclusion
Congratulations if you made it all the way through this tutorial. This is probably the most involved interactive email I have ever built and I hope you enjoyed learning how I did it. I hope this inspires you to build your own interactive emails and to make them into fun interactive games!